

We all know that you can use the Theme Designer to make your form look absolutely wonderful, attractive, lovely, beautiful, brilliant…and we’ll stop now before we get too carried away. (Too late.) It may be a little less well known, however, that it’s possible to use your own CSS in a theme to fully customize the look and feel of your forms.
So we’ve already whipped up a nifty blog post that gives details on how to use custom CSS in a Wufoo form. This post is ace and can really help you add custom CSS to a form.
But for those of you wanting to get down into the real nitty gritty on creating your own CSS style sheet from scratch–this post shall reveal all. Even better, we’re not stopping at just one post either: Say hello to our CSS Tips ‘n Tricks kickoff Series! We’ll be sharing cool CSS how-tos designed to make your form look even more attractive than say, a stunning beach sunset (really).
In our first installment, we’ll walk you through the steps you need to create a CSS style sheet through Notepad, upload that to Dropbox and apply it to your form.
Ready steady? Let’s go.
1. Create that CSS on Notepad
Let’s start by creating our actual CSS. Generally when Notepad is mentioned, you might hear people asking why the heck you don’t use Word instead. Well, Notepad, we’re on your side for this one. Open up Notepad and add your CSS. For our first CSS trick, we’re going to keep it really simple. We’ll put some nice curves on all our images in the form and give them a reddish border. That’s going to make all your pictures look mega-cool:
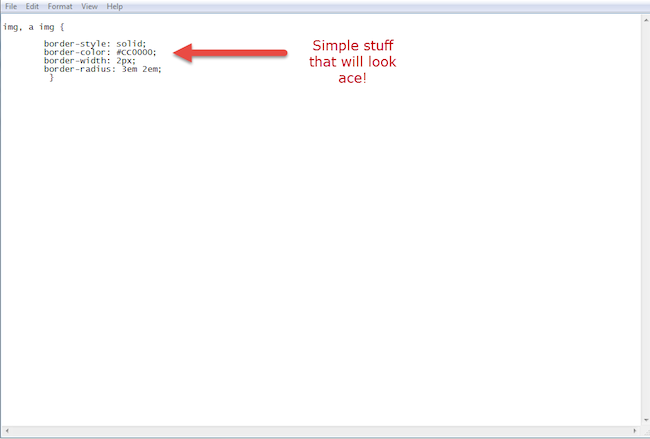
We’ll check out how that looks later, but for now let’s Save this so we don’t lose it. Click File and Save As. This bit is important so pay attention! You’ll want to save the file with .css at the end of the name. That will make sure your file is saved as a CSS style sheet rather than just a Notepad file. It should look a bit like this:

Congratulations. You’ve just created your first CSS style sheet. In order to apply that to a theme in Wufoo, you have to host that sheet on the internet somewhere. This can be hosted on your own website or any hosting site that will host your files using https. We’re big Dropbox fans, so let’s go that route first.
2. Upload your CSS to Dropbox
Uploading a CSS file to Dropbox is simple. Head over to dropbox.com and log in to your account. Once you’ve done that, click the Upload tab as shown here:

Once you’ve uploaded the file, find it in your list and hover your mouse over it. A SHARE button should show up. Just give that a click and you should see this:
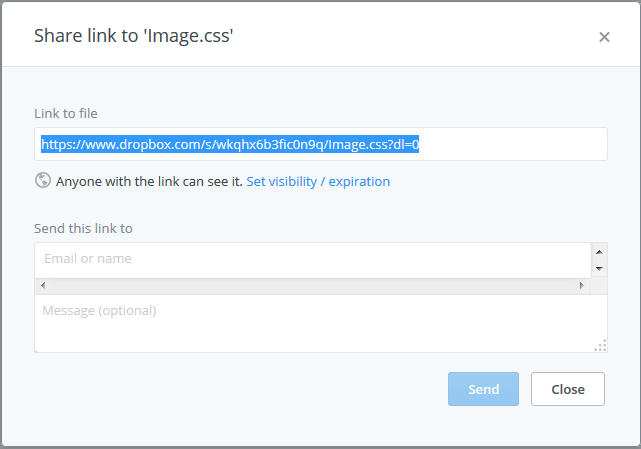
We’re really close to having the finished link but there’s just one more thing. If you were to share the link as is, you’d quickly discover that the CSS doesn’t work. That’s because the link ends in dl=0. The details behind that not working are a bit boring so we’ll spare you. Just change the end of your link to dl=1. Once you’ve done that, you’re all sorted. Add that link to the custom CSS section within your theme designer and your CSS will show up in the form.
3. Add the link to your theme and enjoy
This is the easy bit. Just add that link to your theme via the Theme Designer and apply your theme to your form from the Form Manager. Let’s have a look at our finished product.

Check out those sweet curved edges and cool reddish border, eh?
So we wanted to take you through how to create the CSS from the ground up this time and we hope it was insightful. Stay tuned for more CSS tricks to make your form look (and feel) fantastic.
Questions, comments for our Hails-from-Leeds expert, Kane? Let him know below!
Comments
Everyone needs a hug.
Posted January 7th, 2015 by FyreFeonix.Everyone needs a hug.
Posted January 7th, 2015 by mahmoodafraz.For Google Drive, you may need to follow these instructions to get the https path you’re after:
Posted January 7th, 2015 by designorant.https://support.google.com/drive/answer/2881970?hl=en
Everyone needs a hug.
I need one…after several attempts to change the submit button to hover on a custom css using the necessary tags, it still won’t work! It shows the transition is there and being accepted, but it’s a no go.
Posted January 7th, 2015 by Elaine.@Elaine- It should work with the submit button as well. If you’re targeting the submit button, use the following:
saveForm:hover{ }
Posted January 7th, 2015 by Kane Stanley.and by saveForm I actually mean…………….
saveForm:hover {
Posted January 7th, 2015 by Kane Stanley.:sigh: Apparently our comments don’t allow the pound sign. In front of saveForm, you’ll want to add a pound sign or “hashtag” if you’re hip and cool!
Posted January 7th, 2015 by Kane Stanley.Good…
Posted January 7th, 2015 by hande.