
Okay, maybe not so dirty. But if you’re new to Wufoo and haven’t yet ventured into the infinite (maybe not infinite but it’s a lot) possibilities of Rules yet, you’re missing out. Rules are that extra something that take a fairly simple form and use case and supercharges them to allow you to use Wufoo to solve some fairly complex use cases and applications.
> As always, if you consider yourself a Wufoo Vet (and given how many users we have, there are plenty of you out there!) this post may not be for you. The Back To Basics series of posts are aimed at the newer Wufoo users who want to learn more about the wide assortment of Wufoo features and fully unlock the infinite (again, probably not infinite but close) possibilities of their Wufoo accounts.
Let’s get to it.
—–
1. Make The Form!
Before we venture into setting up rules for our form, we first need a form. When setting up a complex form, I like to first create the entire form with all fields and pages, and from there, add rules and make them dynamic.

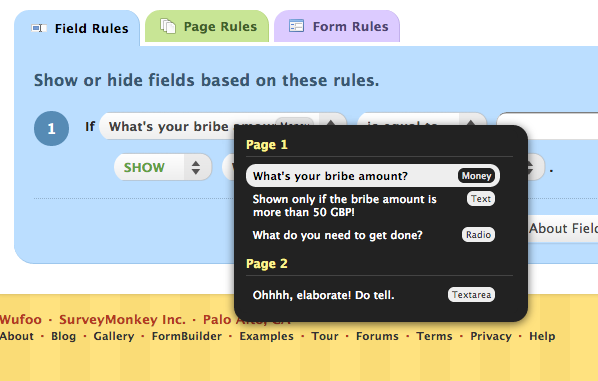
For our purposes, I’m using a form that I’ve created that uses Stripe with global currencies (a recently launched feature enhancement that allows Stripe users to accept payments in various currencies) so that people can send me bribes for various tasks they want me to do. In this form I have:
A. Price Field: This field allows people to input how much they want to bribe me with.
B. Text Field: This field is an arbitrary field that I want to be shown only if the bribe amount from the Price Field is more than 50.00 GBP.
C. Multiple Choice Field: This field allows the user to let me know if what I need to do is simple or elaborate. If it’s simple, we don’t need a long explanation (I mean, if it’s a simple bribe, why have it in writing, amirite?) so we’ll skip the page with the paragraph box and just get straight to payment. But if the task is elaborate, the user should see the second page, shown here in D.
D. Paragraph Field: This paragraph field appears on the second page. The second page will only be shown to users if they selected “Something much more elaborate” from the multiple choice field in C.
There, we have our form with all of the possible fields and pages. Now it’s time to add Rules and make it really sing.
2. Add A Touch Of Rules

To add rules to our nifty new form, just head to the Form Manager which lists all of your forms. Find your form, click the “Rules” button and you’ll be taken to the Rule Manager for your form. Now it gets fun!
3. Creating A Field Rule
The first rule we’ll be creating is the rule where we’d like to show the text field only if the price is higher than 50.00 GBP. Since this is a rule that will simply show or hide another field on the same page, it’s considered a Field Rule. Simply click the “Create A Field Rule” button and the first field rule will appear.
To make our rule, you select which field you want to monitor, in this case the “What’s your bribe amount?” field. To do this, you click the first drop down menu which lists all of the fields on your form then select the field which you want to create this rule for.
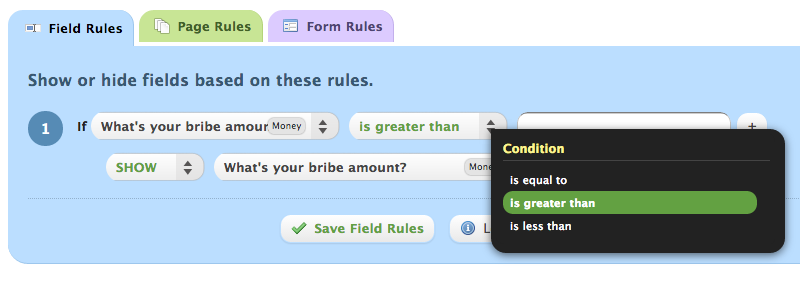
Next, we choose the rule criteria. In this case, we only care if the amount inputted into this field is more than 50.00 GBP. So we choose the criteria drop down and we select “is greater than”. Now we move over to the next input field where we’ll enter in 50.00. Note: for price fields and rules, you’ll need to specify out to the cents (or pence in this example).

Finally, we want to show the text field in our example form, so we’ll choose the last drop down menu and select the field we want to show, in this case we’ll select the “Shown only if the bribe amount is more than 50 GBP!” field. Click “Save Field Rules” and your first rule is all set.
You can see that the rule matches what we are trying to do by simply reading it in the Rule Builder:
> If “What’s your bribe amount?” is greater than 50.00 show “Shown only if the bribe amount is more than 50 GBP!”.
Pretty cool huh? Now, let’s tackle that Page Rule.
4. Creating A Page Rule
Remember that we only want people to clarify their bribery task on the second page of the form only if the task is elaborate. So we’ll need to make a rule that only shows the second page of this form if the value of the multiple choice field is “Something much more elaborate.” For that, we need to create a Page Rule. To do that, simply hit the tab labeled, “Page Rules” click the “Create a Page Rule” button, and your first page rule will appear.
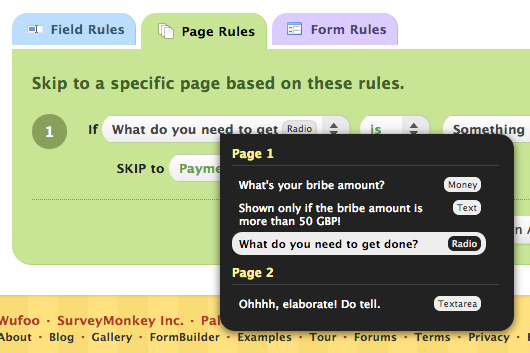
Like creating a field rule, we’ll first need to select which field we’ll need to monitor. In this case, it’s the “What do you need to get done?” field.
This is where things get tricky, so pay attention. In the third drop down, instead of selecting “Something much more elaborate.” we’re instead going to select “Something simple.” as the option. We do this since Page Rules allow for skipping pages and we only need to skip the second page in our form if the task is simple. Hence, we choose “Something simple.” here as our option.
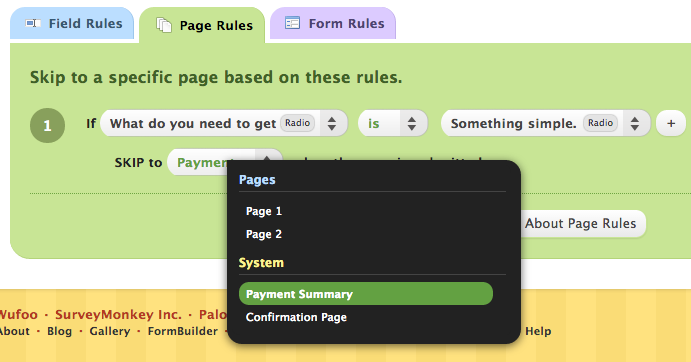
Finally, we then close the loop by saying if the option selected is “Something simple.” then we’ll skip all the way to the Payment page, skipping Page 2 altogether. This way only people with elaborate tasks need to describe their task and those with simple tasks can get to paying us our bribe!
—–
And there we have it, a fairly simple form that utilizes Field Rules and Page Rules to add complex functionality to the form and make it super powerful. There are endless possibilities and applications of using Wufoo with Rules to create really elegant solutions to hard, complex problems and workflows. If you want more in depth information about rules, you can find them here in our handy dandy Help Docs about the Rule Builder.
As always, if you have any questions or comments, leave them below. We love to hear from our customers and readers and hope you found this guide useful!
Comments
How about a rule to require certain formats on phone numbers?
Posted April 4th, 2014 by Lou Sander.@Lou do you mean beyond what you can find with the Phone Number field type? http://help.wufoo.com/articles/en_US/SurveyMonkeyArticleType/Field-Types#phone
Posted April 4th, 2014 by Johan Lieu.Everyone needs a hug.
BOA TARDE!
Posted April 4th, 2014 by Margareth Carvalho.QUERO SABER SE ESTOU NO CADASTRO DA wufoo?
Everyone needs a hug.
BOA TARDE!
QUERO SABER SE O MEU FORMULÁRIO, ESTA CRIADO?
Posted April 4th, 2014 by Margareth Carvalho.OU COMO ABRIR UM FORMULÁRIO?